It’s no surprise that given how ingrained the internet is in our culture and society that more and more radio stations, sports teams and individual broadcasters are moving away from things like tie-lines and phone connections and incorporating internet audio as a primary method of delivery for live sporting events.
In the past, I’ve covered various ways to broadcast online including listing off some Online Platforms for your Broadcast but I wanted to focus more on a DIY solution that offers total control and potential for a 24/7 content stream…namely creating your own internet radio station. It’s a technique I took advantage of in 2014, and a format that the Washington Capitals bought to the NHL a year later. In technical terms, we’re talking about Shoutcast which is software for broadcasting media over the internet. It’s similar technology that is used in streaming AM/FM radio stations on the internet and is incredibly reliable, provides crystal clear audio and thanks to modern technology, readily available.
Here are the steps I used to create my own online radio station that streams 24/7 online and can be accessed by anyone around the world via computer, tablet or smartphone:
- Find a Shoutcast Host
Much the same way that you need a host for a website, you need a host to stream audio. While there are workarounds, nothing has the reliability of purchasing a dedicated host for your internet audio stream. It means that hundreds, thousands of people can connect to your stream simultaneously as the host does all the heavy lifting. Essentially you connect to the host and stream out, listeners connect to the host and listen.I won’t recommend a specific host, there are a few that I’ve used over the years. However a quick search of Google for “shoutcast hosting” will yield a bunch of results. Compare pricing and what you get for your money. You’re looking to try and get maximum uptime, bitrate (amount of kbps), bandwidth and simultaneous listeners as possible for the least amount of money. The host that I signed with is $150 (USD) a year and provides unlimited simultaneous listeners at 128kbps and a fair amount of storage (we’ll get to that later)
- Set Yourself Up to Go Live
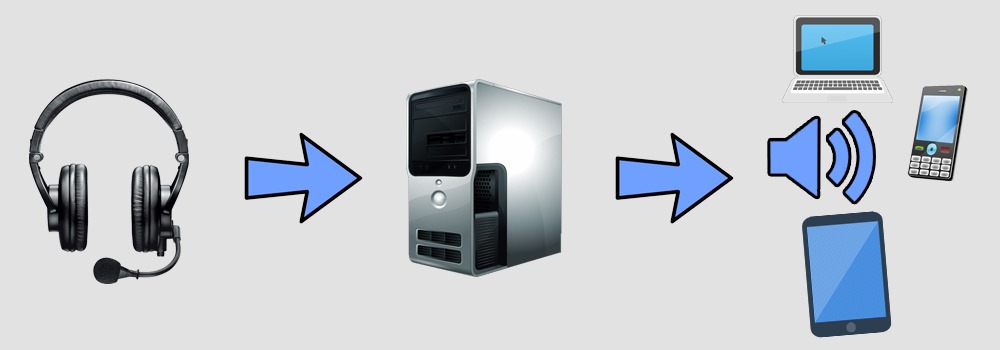
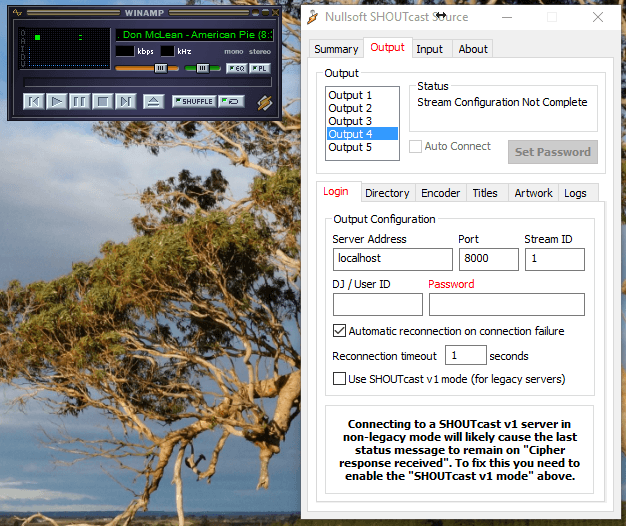
Once you’ve got yourself setup on a host, it’s time to connect everything at your end of things. As mentioned above, the idea is that you broadcast directly to a server, not each individual listener. Then those listeners tune into the server to hear (or see if you do it that way) the action. This way means you’re not draining your internet connection from the arena/stadium site and people get an uninterrupted feed of the broadcast.The program we’ll use to achieve this is called WinAmp. For those who haven’t heard of this audio player, it’s been around for years and was once quite popular with DJ’s as a way to play live sets, plus as just a general audio player. It’s free to download and if nothing else is just a really useful program. We’ll couple WinAmp with a Shoutcast plugin, both of which you can download and install at the link above.With both WinAmp and the Shoutcast plugin opened, you will end up with a screen that looks something like this:
- Configure your stream
This is where things will differ from host to host. I’ll run you through my setup on my host, however yours may be slightly different. What will be common is the information available and many quality hosts provide either live chat or email support to help you in this process.When you purchase your hosting, you’ll be guided into an admin area called “Centova Cast”. This is the engine room of the whole operation and where we’ll spend a lot of time from here on out. Login with the information provided when you registered and you’ll find yourself on the home screen.Under the menu on the left hand side is where you’ll find two options that we’ll need to setup before we go live. The first is a DJ, which is essentially login information for specific users. It’s under the ‘Configuration’ menu. You can have different logins for different people, configure them so that they can only connect at certain times of day and make it so that you can have multiple contributors to your station. Once you’ve got at least 1 DJ setup, move over to the ‘Quick Links’ section under ‘General’.
Here you’ll find all the information that you need to go live through WinAmp. Transfer over the information provided into the corresponding spaces on the output tab of WinAmp’s Shoutcast Plugin, being careful to note which version of Shoutcast you’re running on the server. You can talk more with your host on this issue, however I found it easier just to trial and error until I got the right combination.
Fill in all the information, or as much as you can in the other tabs and then you’re ready to go live. Once you have the information in there, it’s just a simple matter of hitting the ‘connect’ button to begin streaming.
With one click of the black play button, you’re live. You can select to either output Winamp itself (just music), or more likely you’ll want to output the Soundcard. This means that it will take whatever is being plugged into the microphone jack of your computer, which can be a microphone or a full mixer.
You’ll notice that while I have a 128kbps server, I’m only broadcasting at 96kbps. CD-quality audio is 96kbps and is completely sufficient for voice broadcasting and play by play. In fact many internet streams are even lower, clocking in at 64kbps. I found that when I was streaming at 128kbps, the stream cut in and out for people listening on their cell phone while not on WiFi and was overall less reliable. A step back in quality noticeably improved the listening experience while doing little to nothing to the actual audio quality.
Now anytime I want to go live, I connect my mixer into my microphone jack (the pink one) on my laptop and away I go. One click automatically makes all the connections and then listeners are able to tune in using any one of the links available in Centova Cast and the “Quick Links” area. To end a broadcast, simply click the same button and you’re off air.
Many hosts also offer embedded players, mobile apps and other services to help people listen in and you should follow up with those with your individual host.
- Going 24/7
What sets this system apart from using a service like MixLR or uStream is the fact that you not only have more control over your live content (no ads), but you can also setup a live streaming 24/7 radio station to run regardless of whether or not you have a computer on or connected to the internet.With many hosting packages, there will be an offer of disk space for you to store audio. My server charged an extra $10 as a flat fee for 5gb of disk space on their servers. When recording, saving and uploading in mp3 format, that’s an obscene amount of audio. After games I would save the call as an mp3 and upload it to the server using an FTP client or other upload method. I then built playlists, placed my media in them and it would play throughout the day. I’m speaking of the “AutoDJ” feature in Centova cast that allows you to play program director. Schedule things to run on random, or be more precise. Play music, archived games, player features, interviews, podcasts and more.The station will continue to run 24/7, playing the uploaded audio even when you’re not connected live. When it comes time to do a game, conencting via WinAmp will fade out the Auto DJ content and replace it with whatever you’re streaming.
That’s it. A way to have total control over your broadcasts this season. The response we got from the 24/7 station that I setup for the team I worked for at the time was fantastic and far exceeded expectations. Centova Cast provides detailed statistics of listening hours and other metrics, in a similar fashion that Google Analytics provides you a good look at web traffic. This is useful for sales as you can show exactly who is listening, where they’re from and how long they’re staying.
Have you tried this method? Did you like it? Do you have any setup questions? Comment below or find us on Facebook or Twitter.

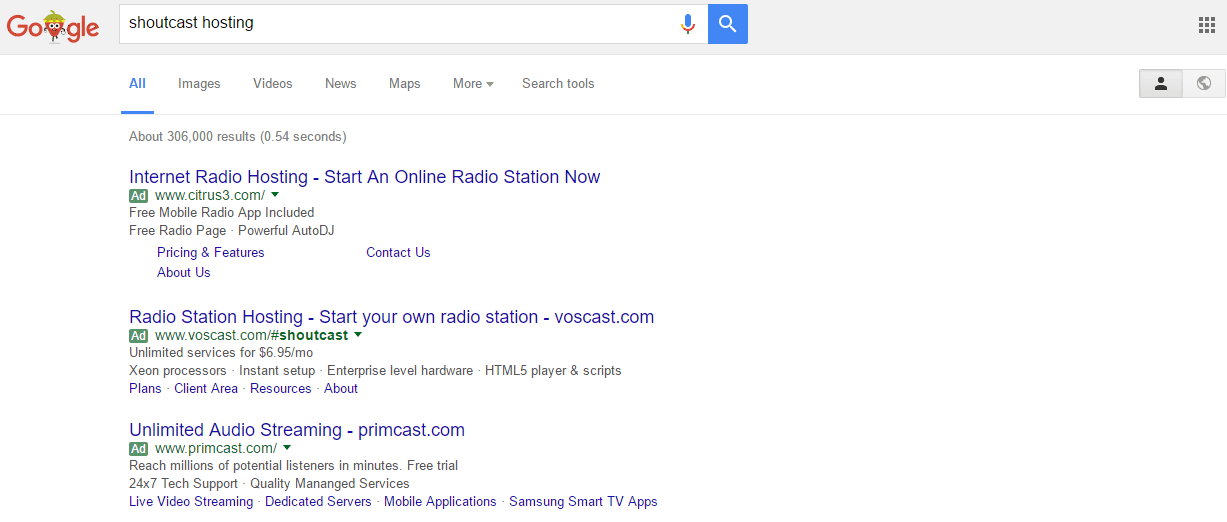 I won’t recommend a specific host, there are a few that I’ve used over the years. However a quick search of Google for “shoutcast hosting” will yield a bunch of results. Compare pricing and what you get for your money. You’re looking to try and get maximum uptime, bitrate (amount of kbps), bandwidth and simultaneous listeners as possible for the least amount of money. The host that I signed with is $150 (USD) a year and provides unlimited simultaneous listeners at 128kbps and a fair amount of storage (we’ll get to that later)
 The program we’ll use to achieve this is called
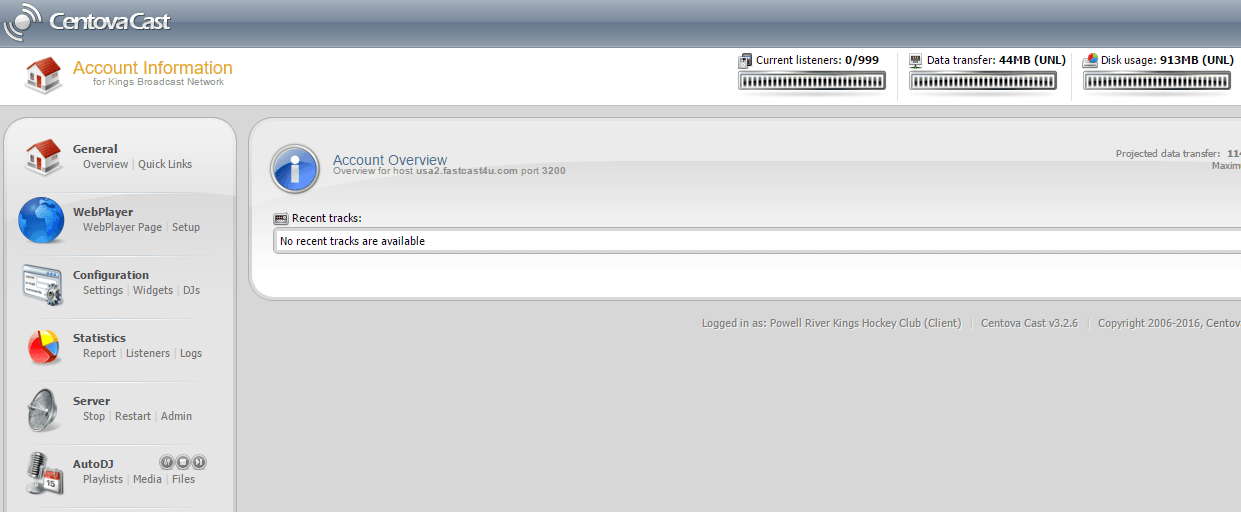 Under the menu on the left hand side is where you’ll find two options that we’ll need to setup before we go live. The first is a DJ, which is essentially login information for specific users. It’s under the ‘Configuration’ menu. You can have different logins for different people, configure them so that they can only connect at certain times of day and make it so that you can have multiple contributors to your station. Once you’ve got at least 1 DJ setup, move over to the ‘Quick Links’ section under ‘General’.
 Here you’ll find all the information that you need to go live through WinAmp. Transfer over the information provided into the corresponding spaces on the output tab of WinAmp’s Shoutcast Plugin, being careful to note which version of Shoutcast you’re running on the server. You can talk more with your host on this issue, however I found it easier just to trial and error until I got the right combination.
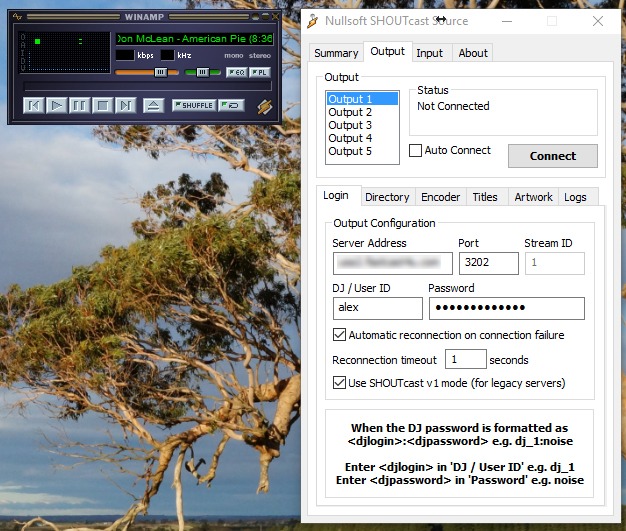 Fill in all the information, or as much as you can in the other tabs and then you’re ready to go live. Once you have the information in there, it’s just a simple matter of hitting the ‘connect’ button to begin streaming.
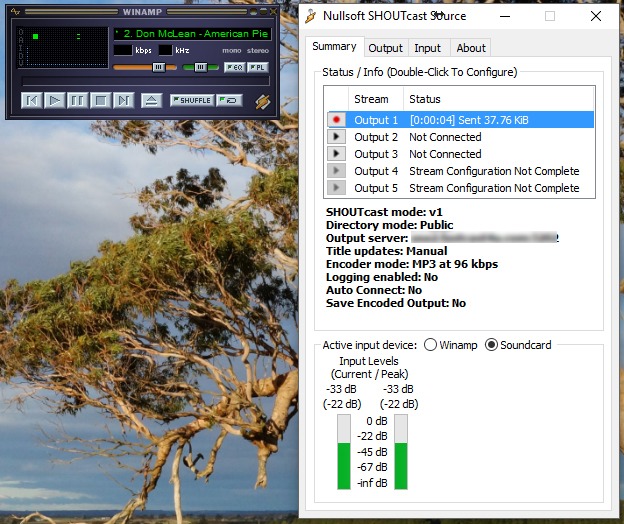 With one click of the black play button, you’re live. You can select to either output Winamp itself (just music), or more likely you’ll want to output the Soundcard. This means that it will take whatever is being plugged into the microphone jack of your computer, which can be a microphone or a full mixer.
 The station will continue to run 24/7, playing the uploaded audio even when you’re not connected live. When it comes time to do a game, conencting via WinAmp will fade out the Auto DJ content and replace it with whatever you’re streaming.
