One of the biggest advances in sportscasting over the last few years has been the accessibility of live broadcasting video online. What started out with a platform like Periscope, has evolved into wide reaching access to both Facebook Live and YouTube Live Streaming. Both platforms allow you to be ‘on the air’ instantly from your smartphone, however for those broadcasting sports, here’s the best way to stream your games online to Facebook or YouTube.
What You’ll Need
Outside of your normal broadcast gear (headset, mixer, etc), the requirements for this are very very simple. You will need a way to bring audio into your computer, either through a USB interface, or via the headphone jack on your computer. You’ll also need to download a program called OBS (Open Broadcaster Software) Studio. This free, open-source program is the workhorse of this operation.
You will also need a camera. If your computer has a video capture card, then you’re set…however most consumer laptops don’t so we then turn to USB webcams. HD webcams designed for Skype chats and other uses often stream at least 720p resolution (1280×720), or higher. Look for the highest resolution camera available in your price point.
Of course you’ll also need either a Facebook page that you can go live to, or a verified YouTube account with the live streaming options enabled (click here for instructions on that).
How to Setup OBS, Facebook and YouTube
OBS, or Open Broadcaster Software is a fantastic and free program that enables you to broadcast a professional-level show to multiple platforms including YouTube and Facebook. Download OBS from their website and install it on your system. It has versions for Windows, Mac and Linux.
Once installed, you’ll have a screen that looks something similar to the screenshot above, with a preview monitor on the left that allows you to test out configurations and see shots before they go live, and your program screen on the right which is what the viewers see. Down the bottom are your scenes, sources, audio meters and stream controls. We’ll cover those in a minute.
Click the ‘settings’ button on the lower right hand side and go to the ‘Stream’ tab. Here you’ll select your preferred streaming platform. Whether it’s Facebook or YouTube, you will need to identify a stream ID or key.
On YouTube, your stream ID is available on the Live Dashboard section of the Creator Studio. Scroll to the bottom and you’ll see both a server URL and your stream key. Reveal it, copy and paste it over to OBS and you’re connected to your YouTube channel. When you hit ‘start streaming’ on OBS, you’ll automatically be connected to YouTube.

For Facebook, the process is nearly identical. Go to “Publishing Tools” on your page settings, select videos and then “+Live” up the top right. This will show you the stream key that you need to copy into OBS. Hit ‘next’ on Facebook and enter all the details on your stream. Once you’re streaming on OBS, click ‘go live’ on Facebook and the two are connected. Unlike YouTube where the platform is a slave to OBS, Facebook requires to see a stream from OBS before it’ll go live.

Setting up your Broadcast
Now all the technical issues are out off the way, you can set up your broadcast. OBS works through selecting various ‘scenes’. Each scene can be as simple as a still graphic, a video, a live camera, or as complicated as a multi-layer scoreboard or on-screen graphic. Just as live TV shows, news broadcasts and sporting events ‘switch’ between camera angles and graphics, you switch between scenes to achieve the same result.

For a recent live broadcast, I utilized just two scenes. Our goal was to keep things very simple, however we could have easily added more. I haven’t found a limit on the number of scenes or sources, however consider the speed of your computer as the more scenes, the more resources and the slower it will run.
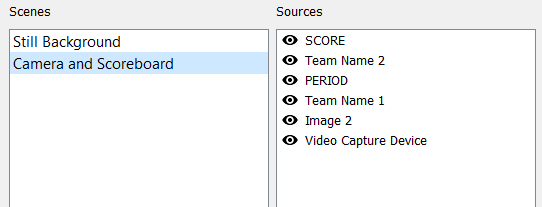
The two scenes I had setup were a still background with a logo on it to use as a pre-game graphic/slate. This ran before the broadcast officially began. The second, and most complicated was the game camera and scoreboard…and here’s how I set that up.
Creating Camera/Scoreboard Scene
Scenes work on a layer principle. The order of each item dictates how it’s seen on screen. This means that your base video layer…the game camera…will be on the bottom. First, create a scene by clicking on the ‘plus’ icon in the scenes area, naming it “Camera and Scoreboard” and clicking ok. Then, with that scene selected, begin building your sources.
Your game camera is the base layer, and if you’re using a USB webcam like I did, you’ll want to have it plugged in, installed and online. Click the ‘plus’ icon in the sources area and select ‘video capture device’. Select your device and click ‘ok’. You’ll now see your camera on the preview monitor where you can move it around, resize, crop or otherwise manipulate it. Stretch the camera out to full screen and congraulations, you’re done.
This setup here is more than sufficient for broadcasting a game. If you purchased an HD webcam, and you have a sufficient internet connection, the broadcast will go out in HD (720p) and fans will love it. However with a little preparation we can take it to the next level with an easy to update scoreboard.

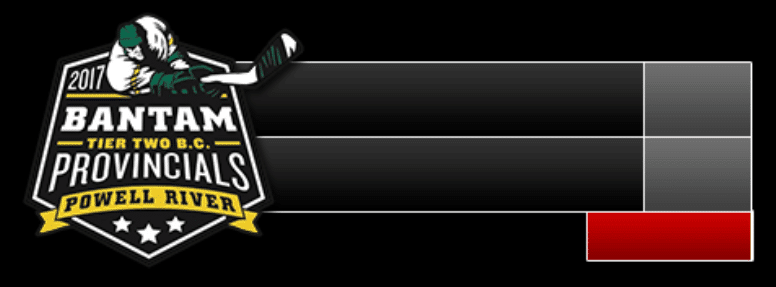
The next layer on my scene is an image…it’s the base image for the scoreboard. I created this very quickly in Photoshop by making a 1280 x 720 document with a transparent background. I then designed a scoreboard at the approximate size I wanted it on the screen and saved it as a PNG with transparency. Much like the video capture device, I then clicked the ‘plus’ icon, chose image, browsed to where I saved my image and hit ok. Position, resize and you’re set.
The rest of the layers are all text, which are done inside OBS. Each team name and the period are different text elements and are done in the same way that adding other sources are. Select font and sizing options for each and hit ok. Size and position according to your scoreboard.
For the score itself, I wanted to see if I could build it into one element. I lucked out a little in how I designed the scoreboard where I was able to create one text element and have the score on different lines (just by hitting enter/return on my keyboard). The benefit of this system is that during the broadcast, I could have the edit window open for this text element, and easily change the score on the fly. Any change to the element is automatically reflected live on air, which made for easy changes.
Other possibilities with OBS
Really the possibilities are endless with OBS. Like we did with the Live Sportscasting Webinar in February, you can do split screens with multiple video capture devices, or screen captures. You can do videos, you can stream powerpoint slides, specific windows/progams on your computer…really the possibilities are only limited by your own willingness to explore and build.
OBS of course supports other platforms that are popular with gamers, however for sportscasters the use of Facebook and YouTube to live stream has given us a new way to connect with an audience and a very easy way to produce professional-level broadcasts for our teams. If you want to check out what we did at the Provincial Championships, click here to watch a little of the broadcast to see the scoreboard and everything in action.
Have you used OBS? Showcase some of your broadcasts with us on social media or in the comments below.


